 Image from Wikimedia Commons
Using Virtual Environments in Jupyter Notebook and Python
02 Feb 2019Table of Contents
- Create Virtual Environment with Virtualenv/venv
- Create Virtual Environment with Anaconda
- Add Virtual Environment to Jupyter Notebook
- Remove Virtual Environment from Jupyter Notebook
Are you working with Jupyter Notebook and Python? Do you also want to benefit from virtual environments? In this tutorial you will see how to do just that with Anaconda or Virtualenv/venv.
Before we start, what is a virtual environment and why do you need it? A virtual environment is an isolated working copy of Python. This means that each environment can have its own dependencies or even its own Python versions. This is useful if you need different versions of Python or packages for different projects. This also keeps things tidy when testing packages and making sure your main Python installation stays healthy.
Create Virtual Environment with Virtualenv/venv
A commonly used tool for virtual environments in Python is virtualenv. Since Python 3.3, a subset of virtualenv has been integrated in the Python standard library under the venv module. If you are using Python 2, you can install virtualenv with:
pip install --user virtualenv
Now, you can create a virtual environment with:
virtualenv myenv
where myenv can be replaced with the name you want for your virtual environment. The virtual environment can be found in the myenv folder. For Python >= 3.3, you can create a virtual environment with:
python -m venv myenv
After you have created your virtual environment, you can activate the virtual environment with:
source myenv/bin/activate
To deactivate the virtual environment, you can run deactivate. To delete the virtual environment you just need to remove the folder with the virtual environment (e.g. rm -r myenv). For further information, have a read in the virtualenv documentation or venv documentation.
Create Virtual Environment with Anaconda
Let’s have a look how to create an virtual environment with Anaconda. Anaconda is a Python (and R) distribution that has the goal to simplify package management and deployment for scientific computing. After the installation you can create the conda virtual environment with:
conda create -n myenv
where myenv is the name of your new environment. If you want a specific Python version that is not your current version, you can type:
conda create -n myenv python=3.6
The environment is then stored in the envs folder in your Anaconda directory. After you have created the enviroment, you can activate it by typing:
conda activate myenv
If you now run python, you’ll see that you are in your freshly created virtual environment. To deactivate the environment you can type conda deactivate and you can list all the available environments on your machine with conda env list. To remove an enviroment you can type:
conda env remove -n myenv
After creating your environment, you can install the packages you need besides the one already installed by conda. You can find more information on how to manage conda environments in this user guide.
Add Virtual Environment to Jupyter Notebook
Jupyter Notebook makes sure that the IPython kernel is available, but you have to manually add a kernel with a different version of Python or a virtual environment. First, make sure your environment is activated with conda activate myenv. Next, install ipykernel which provides the IPython kernel for Jupyter:
pip install --user ipykernel
Next you can add your virtual environment to Jupyter by typing:
python -m ipykernel install --user --name=myenv
This should print the following:
Installed kernelspec myenv in /home/user/.local/share/jupyter/kernels/myenv
In this folder you will find a kernel.json file which should look the following way if you did everything correctly:
{
 "argv": [
  "/home/user/anaconda3/envs/myenv/bin/python",
  "-m",
  "ipykernel_launcher",
  "-f",
  "{connection_file}"
 ],
 "display_name": "myenv",
 "language": "python"
}
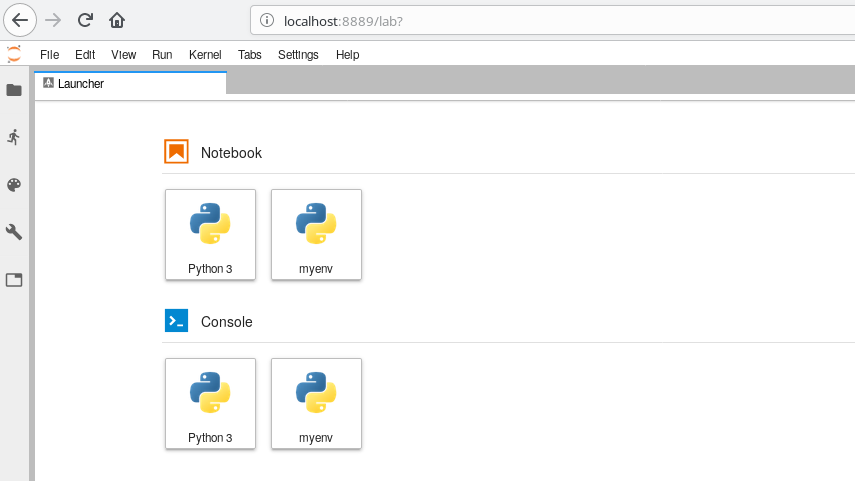
That’s all to it! Now you are able to choose the conda environment as a kernel in Jupyter. Here is what that would look like in JupyterLab:
Remove Virtual Environment from Jupyter Notebook
After you deleted your virtual environment, you’ll want to remove it also from Jupyter. Let’s first see which kernels are available. You can list them with:
jupyter kernelspec list
This should return something like:
Available kernels:
  myenv      /home/user/.local/share/jupyter/kernels/myenv
  python3    /usr/local/share/jupyter/kernels/python3
Now, to uninstall the kernel, you can type:
jupyter kernelspec uninstall myenv